TeamViewer is a remarkable piece of software that let’s you share control of your computer with another person.
It works round any firewall / router complications that Remote Assistance normally has, and I use it regularly to help friends / family with their problems.
Best part is, it’s free for non-commercial use!
Here’s how to use it:
Step 1 – Download TeamViewer
To download TeamViewer, please visit www.teamviewer.com
There should be a little green box on the right hand side of the website that says “download now” or something to that effect.
Once you have downloaded it, double click it.
Step 2 – Running or installing TeamViewer
Sometimes, this box will appear – just click “Run”
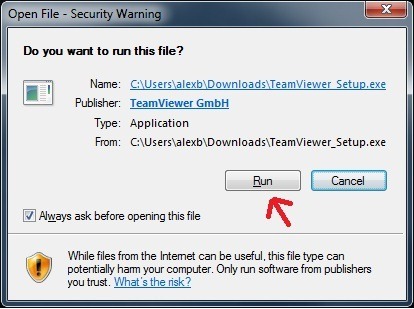
On this screen, select Run.
Since we don’t need to install the TeamViewer software, there is no point doing so.
Click next….

Step 3 – Accept License Agreement
Read all the way through it if you really want, however I’ve never come across a EULA (End User License Agreement) that I don’t agree with….
Select the I accept checkbox, then press Next….

Step 4 – Connect / Be connect to….
If you want someone to connect to your computer, to give you help:
See the left hand panel – Wait for session – Simply give the other person your ID and Password.
If you want to connect to someone elses session:
Enter the ID in the box on the right hand panel. Click “Connect to partner”
It will then ask you for their password.
A box, not unlike Remote Desktop Connection will then appear.

Hi,
Thank you for this nice post from the TeamViewer crew in Germany.
We really appreciate your positive feedback!
To be up to date with TeamViewer, please subscribe to our feed:
http://feeds.teamviewer.com/company/newsfeed.aspx.
If you have any further questions or require further information please don’t hesitate to contact me.
All the best,
Jasmin
TeamViewer GmbH Germany
No problem 🙂